1989 SE50 eliteR

This is the place to post your scooter builds; everything from stock Spree restoration to water-cooled drag bikes.

Moderator: Moderator

Quag
BMX
BMX
Posts: 22
Joined: Tue Sep 22, 2009 10:15 am

1989 SE50 eliteR

Post by Quag »

The other day my neighbor gave me this old ratty SE50 for free!. Now im more of a motorcycle guy (never had a scoot in my life and currently ride a bored and stroked ducati) but FREE is FREE! also my nephew asked for a scooter for last xmas. after i finished laughing at him i asked again, same reply. He would have been disapointed if he had any belief that he might actually get one from me or anyone else, but im pretty sure he's smarter than that. Well this Xmas im gonna give him a big surprise and take BEST UNCLE EVER! prize over my bro! Course i have several other nieces and nephews but theyre all too young to ride the SE50 so he wins! Now this Scooter has been parked for at least 2 years. and will have to pass an inspection before my nephew can ride it.

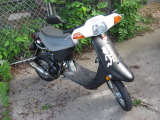
So here is my mission. Get it to run, pass safety and look half decent.

Image


Progress so far. Bike runs! good start i know. didnt do much new battery, cleaned the spark plug, drained the carb and put in fresh gas. took several kicks but starts every time on fist kick now. Next step is fine tuning. My brother lives near an abandoned go cart track. We will bring it there for some fine tuning of the engine. OK OK were gonna go thrash the thing and have fun. Hopefully will have pics of this critical step later on. Also i happened to find some red vinyl that is very very close to honda red to redo the seat. Now i have to decide do i go for original paint job or just make life easy and paint it all black? decisions decisions.
Last edited by Quag on Sat Sep 26, 2009 9:27 am, edited 1 time in total.
User avatar
bradthreee
Board Supporter
Board Supporter
Posts: 2142
Joined: Tue Sep 12, 2006 4:20 pm
Location: MARS...

Re: 1989 SE50 eliteR

Post by bradthreee »

Free is Freeis correct my friend!

I have a similar story as when I was a kid my uncle gave me a Spree making him the "best uncle ever"! That was over 20 years ago and I still speak to him about memories of riding the scooter to this day!

Keep in mind when wanting to paint the scoot, that paint has trouble adhereing to the floorboard. No one has found a good DIY paint that will hold for extended periods of time.

Good luck with your project and keep us posted!
:coolcruise:
User avatar
SpyderMike
Elite
Elite
Posts: 319
Joined: Fri Aug 01, 2008 10:33 pm
Location: Racine, WI

Re: 1989 SE50 eliteR

Post by SpyderMike »

i painted my floorboard w/ rustoleum auto paint

held up all season so far
Quag
BMX
BMX
Posts: 22
Joined: Tue Sep 22, 2009 10:15 am

Re: 1989 SE50 eliteR

Post by Quag »

Thanx for the info on the painting. I got a few ideas. In case i wasnt too too clear this is mostly a cosmetic rebuild. Nothing fancy being done mechanically, just want it to work right.
So having said that first thing to do was rebuild the carb, cant have it work right with bad carberator. here are pics of carb before, during and after the rebuild.
Note thanx Dac http://www.hondaspree.net/phpBB3/viewto ... f=5&t=8786
Pics to keep you from forgetting anything always good. Also never thought of using qtips before, i always fidgeted with rags and paper towels

Image

Image

Image


The carb is reinstalled and seems to be working well. My street is currently having the water mains and sewer lines replaces so is just a big ditch. This meant that i could only go up and down my driveway for a test yesterday. Unfortunately my plans to take it to the go kart track are not gonna work this weekend. So ill just go Xcountry across the neighbors lawns to the next street and drive it around the block to make sure it is working ok. Not as scientific and rigourous testing at the track i know, but what can you do (okok it just not as much fun)
Quag
BMX
BMX
Posts: 22
Joined: Tue Sep 22, 2009 10:15 am

Re: 1989 SE50 eliteR

Post by Quag »

OK i have the bodywork off and removed the wheels. seems ill need to add brake shoes to the shopping list. they aren't completely gone but brakes are by far the most important thing and i don't want my nephew to get hurt. and by extension my sister causing me bodily harm!!! I have discovered a new problem though. I knew the center stand was bent and thought no biggie but then i saw where it connects to the frame. i have a few ideas on how i want to fix it. there are several options. Im looking for ease and cost here.
Image

Note how worn the pin is, ill need a new one of these as well. Ok ill just make one out of a bolt or something.

Image

Heres a pic of all the body panels taken off. the ziplocks are holding bolts etc. most will have to be replaced but i find it easier if little things like this are separately bagged it makes it easier to find the right bolt for the right job.

Image

Now im working on recovering the seat. ill have pics on that soon enough. as i havent seen any posts on how to do this here ill post more indepth on the steps taken to do this (assuming i actually succeed in making it look half decent, so far so good)
User avatar
wikked_spree57
Elite
Elite
Posts: 980
Joined: Thu Aug 16, 2007 6:50 am
Location: Bridgeport, MI
Contact:

Re: 1989 SE50 eliteR

Post by wikked_spree57 »

bradthreee wrote:Free is Freeis correct my friend!

I have a similar story as when I was a kid my uncle gave me a Spree making him the "best uncle ever"! That was over 20 years ago and I still speak to him about memories of riding the scooter to this day!

Keep in mind when wanting to paint the scoot, that paint has trouble adhereing to the floorboard. No one has found a good DIY paint that will hold for extended periods of time.

Good luck with your project and keep us posted!
:coolcruise:
Guys remember - I used Tractor and Implement paint dfrom Tractor Supply to paint my Spree lime green a few years ago. That held A+ ioncluding on the floorboard with NO prep besides a LIGHT sand and acetone bath with a cloth.

If you mix the colors you can get anything you want! Just to forewarn, use extra hardener. I wound up having to put my panels in the garage on a 90 degree day in front of a Salamander, because they weren't dry after 2 days. Getting it to dry right is tricky but the results are worth it!
1994 BMW 525i 5 speed BEAMER TIME
1983 Yamaha XC 180 - Bought barn fresh in mint condition and 254 miles. Best bike I ever owned :)
User avatar
mookie
Elite
Elite
Posts: 571
Joined: Sun Aug 02, 2009 12:21 am
Location: Athens,Alabama

Re: 1989 SE50 eliteR

Post by mookie »

looking at the pic of the bodywork and i see the seat panels look very similar to the ones,well ONE,on my 87SE...
anyone in the know... are they interchangeable ??

IF they are you REALLY ought to throw those away,(my way) and find some nicer ofr the nephew... :coolcruise:
busting my knuckles on vices since
for long as i can remember
Quag
BMX
BMX
Posts: 22
Joined: Tue Sep 22, 2009 10:15 am

Re: 1989 SE50 eliteR

Post by Quag »

Thanx for the tips i found some paint that seems to be working well. Ive decided to go with the original paint scheme. that way if it does chip off it sill be a similar colour underneath and be less noticable. Also i kinda like the original :)
As to the body work. um sorry i'm repairing it as best i can so youll have to look elsewhere mookie :)
so here is the seat before and after recovering:

Image

Image

It may not be perfect but it's my first time trying to recover a seat and it looks a heck of a lot better than it did before :)
Last edited by Quag on Sat Oct 10, 2009 7:14 am, edited 1 time in total.
User avatar
Wheelman-111
Moderator
Moderator
Posts: 11319
Joined: Wed Oct 22, 2008 5:09 pm
Location: Deepinnaharta, Texas

Re: 1989 SE50 eliteR

Post by Wheelman-111 »

Greetings:

As one who's attempted "upholstery" a few times, may I say: Nice job! :thumbwink:
Wheelman-111
Most of my money is spent on scooterparts. The rest is just wasted.
"ISO": '03 Vespa ET4 Malossi187 74MPH
Flash 9: 2001 Elite SR Contesta 72 ZX Tran, 9:1 Gears, Stock Airbox/Carb/Pipe 58.8 MPH
Punkin: 2010 Vespa/Malossi S78, 61MPH
elitedio
Veteran OG
Veteran OG
Posts: 413
Joined: Sat May 16, 2009 2:32 pm
Location: Mississippi river valley

Re: 1989 SE50 eliteR

Post by elitedio »

Nice to see another older scooter being resurrected. That red and white is a nice scheme.
1989 Elite E with 86cc Dio
Rumia 50mm bore, mini-stroker, 28mm Oko, modified m-x pipe, Carbonfiber reinforced frame.

Image
http://www.youtube.com/watch?v=gKSvdjxvBUA
User avatar
burnt_toast
Veteran OG
Veteran OG
Posts: 3592
Joined: Sat Jul 31, 2004 8:00 pm
Location: Atlanta, GA

Re: 1989 SE50 eliteR

Post by burnt_toast »

good job on the seat, have any tips to share? i gots an aero seat that could use some of that magic hah
projects galore :nerd:
User avatar
mookie
Elite
Elite
Posts: 571
Joined: Sun Aug 02, 2009 12:21 am
Location: Athens,Alabama

Re: 1989 SE50 eliteR

Post by mookie »

man that does look nice!
what material did you use?
what did you sew it with?
busting my knuckles on vices since
for long as i can remember
Quag
BMX
BMX
Posts: 22
Joined: Tue Sep 22, 2009 10:15 am

Re: 1989 SE50 eliteR

Post by Quag »

When i get more time ill post a full description in the tech forum on how i rebuilt the seat. i got all the pics and stuff, just need to get it all posted. A quick note on the seat. i have never recovered a seat before or actually looked up how it is supposed to be done. I thought about it a bit and am 100% certain that what i did will stand up to use and even if it isnt the "proper" way to recover a seat, it sure seems to work.
I've got about 1/3 of the bodywork painted, but the rest is in my parents basement waiting for the epoxy repairs to harden up enough to sand. They currently have no heating, (it should be rectified by 2morrow) except for the fireplace so the epoxy isnt hardening up as fast as id like.

*edit*

ok heres the post on how to recover a seat

http://www.hondaspree.net/phpBB3/viewto ... =3&t=11975
Quag
BMX
BMX
Posts: 22
Joined: Tue Sep 22, 2009 10:15 am

Re: 1989 SE50 eliteR

Post by Quag »

Ok i now deserve the title of WORST UNCLE EVER!! Seems i don't know the ages of my nieces and nephews. The nephew who was gonna get this scooter is turning 16 not 14 as i thought. So now it is going to my brothers daughter instead of my sisters son. She WILL be turning 14 in the spring, so she wins the turning 14 i get a scooter for xmas lottery, Grats Eden :coolcruise:

Ok back to the rebuild. im actually all done, but i'll take a bit to post it all, as well... i'm lazy when it comes to doing this kinda thing :roll:

So here are some repairs in progress on the bodywork. Remember my goal was not to make it perfect, it was to make it look half decent.

this is the inside and outside of the front fairing, it was pretty banged up.
Image Image

The side panels:
Image Image

And floorboards:
Image Image

I Don't really have after pics. i kinda forgot so youll have to wait to see hwo it turned out when i post the all finished pics. It did work pretty good considering my stated goal of making it look Half Decent.

next up will eb the wheels. lots of problems there :roll:
Quag
BMX
BMX
Posts: 22
Joined: Tue Sep 22, 2009 10:15 am

Re: 1989 SE50 eliteR

Post by Quag »

Well the wheels were a bit of a mess. Lots of rust and pretty banged up. I took a wire brush on a drill to clean out the rust and then used a ball peen hammer to try and remove the worst of the dents. Followed by a quick spray of paint to get it all looking pristine and new again. It all turned out pretty well. Unfortunately after i had bought new tubes and tires i managed to pinch both tubes. Hmmm. Not good. i then decided well screw it remvoed the tires and tried using the original tubes, they looked a bit shabby but i wanted to get the scoot back on its wheels that day. Surprise! surprise! No pinching of old tubes and they went on way way way easier than the new ones did. The new ones had 90 degree bends in the valve stems to make filling easier. It also makes installing them way way way harder, removing them as well. In i beat up the wheels quite a bit removing the pinced tubes. Still in better shape than they were before though. So wheels got installed finally after much much cursing and frustration. and a waste of $$ on pointless new tubes that spent a total of 1 hr on the rims. Silly me. No pics of afterwards. seems in frustration i forgot but heres one to show how beat up the rim was.

Image
Post Reply