Page 3 of 4
Re: The Ministroker!
Posted: Wed Jul 02, 2014 11:20 pm
by curtis966
Anybody know if or where I can get a gasket set for a 48mm ruima bbk? I plan on cutting some but would like a template thanks!!
Re: The Ministroker!
Posted: Wed Jul 02, 2014 11:42 pm
by deuce217
curtis966 wrote:Anybody know if or where I can get a gasket set for a 48mm ruima bbk? I plan on cutting some but would like a template thanks!!
Take a piece of regular paper and a pencil and trace over your desired gasket surface. It works great for a template.
Re: The Ministroker!
Posted: Wed Jul 02, 2014 11:52 pm
by LMH
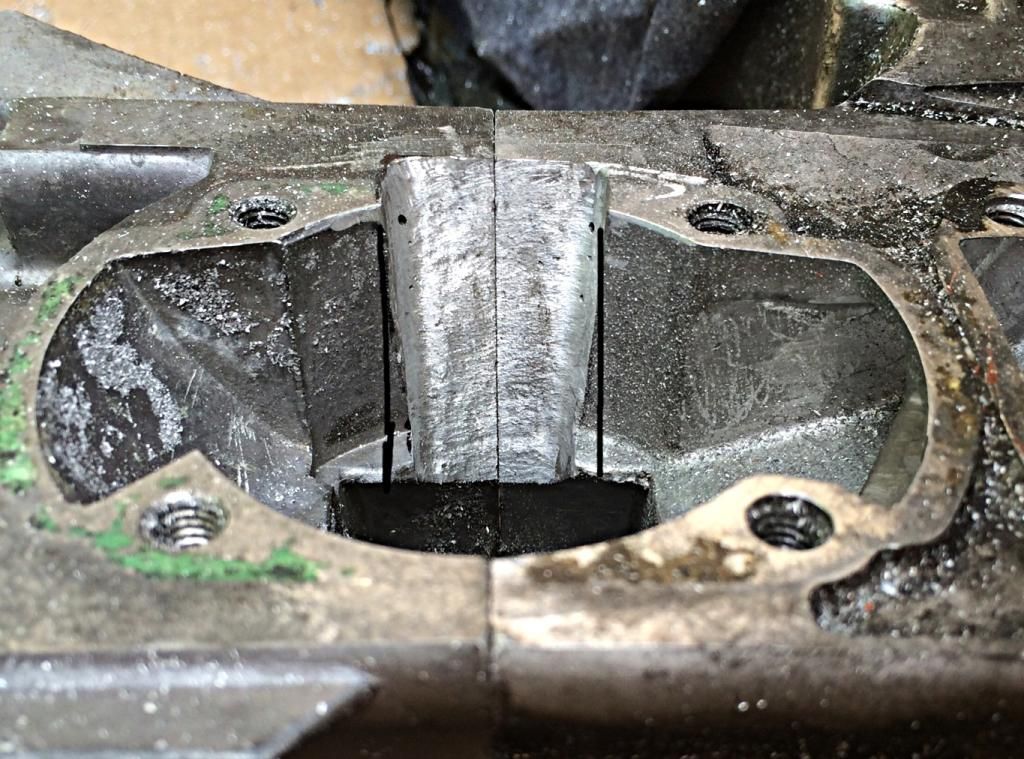
Bring that boost port all the way down, also take a ruler on it to measure width and use a straight edge to ensure a nice smooth flat surface. The straight edge will help you find the valleys and peaks. Not much good if you don't open it all the way or you're just making a trumpet. I don't know if anyone else does their boost ports the way in the pic and have had success but my 13k rpm sc10as is full cut.
Re: The Ministroker!
Posted: Thu Jul 03, 2014 12:15 am
by LMH
Also if you can clean up the corners of the transfer ports on the block it will help the flow. I try to reshape the stator side one to open up with out so much of a sharp corner. It will promote top end power but slow down air flow at low rpm. Can add up to quite a few revs up top but sacrifices some slower speeds. If you do a stuffer crank it will balance it a little more. Or allow you to port even more. Depends what you're going for.
Re: The Ministroker!
Posted: Thu Jul 03, 2014 12:17 am
by curtis966
Thanks deuce guess I didn't think of that simple little trick.
And like this LMH Cut out to the black lines? So the top and bottom are the same width right.
Re: The Ministroker!
Posted: Thu Jul 03, 2014 12:24 am
by curtis966
I have a ruima 43.something mini stroke crank with the orange inserts it's considered a stuffer crank right? At least that's what I think I've understood in my readings lol.

Good to learn now I have all kinds of shiny malossi parts waiting for me to get my other block ready!!
Re: The Ministroker!
Posted: Thu Jul 03, 2014 8:20 pm
by Wheelman-111
Greetings:
Building a ministroker requires the answer to one important question:
Who's the short-haired blonde in the strapless
maillot? She's driving me crazy!
(
Yes, I are a DOM. 
)
Re: The Ministroker!
Posted: Fri Jul 04, 2014 4:17 pm
by curtis966
Got me there wheels lol.
Re: The Ministroker!
Posted: Fri Jul 04, 2014 5:59 pm
by LMH
Yes Curtis cut all the way down, and also angle the cut area at the bottom to where they flow into the boost area. This is including the path from the bottom to the top that the crank circle is letting out to.
Re: The Ministroker!
Posted: Tue Jul 08, 2014 8:38 am
by curtis966
Got some motor time in yesterday while celebrating my birthday. I opened up the boost port fully and flared out the bottom, didn't mess with the transfers much just smoothed out some areas and opened up the corner on the intake side so it flows with the intake better. Then using frozen bearings and a heat gun installed my bearings without issue. About 10 minutes with the 1500watt heat gun and they dropped right in with a slight tap of my rubber mallet they both popped nice and seated. I noticed my case dowels were pretty out of shape so I'm gonna order some before I pull the crank in.
Re: The Ministroker!
Posted: Tue Jul 08, 2014 9:58 am
by LMH
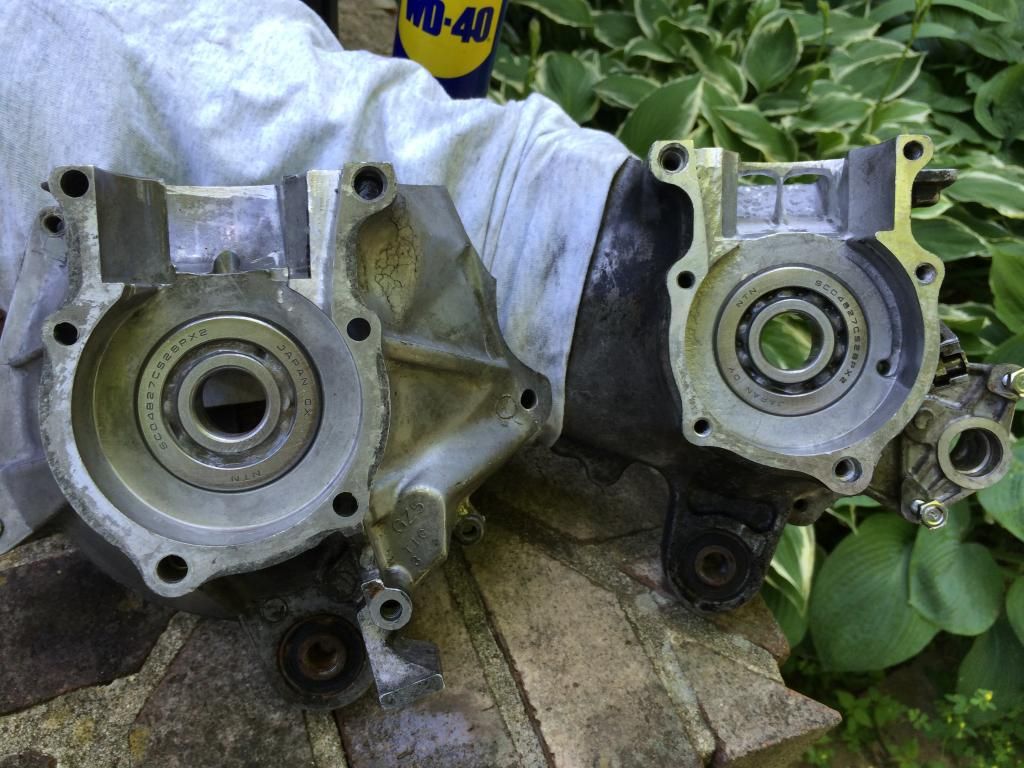
Before you go to far into re assembly get the intake windows to be extremely matched in size. Look at the picture you will see what I mean. The front window is smaller than the rear. Front is towards oil pump.
Re: The Ministroker!
Posted: Tue Jul 08, 2014 10:02 am
by LMH
Also take your cylinder you're going to be using and install it in the case half with the window and scribe the cylinder bottom and port that to match the flow path. At least angle it if nothing to where the intake flow path is not hitting a flat wall. Just envision the air flowing through the engine. Anything with an eddy or ridge with in the flows path needs to be smoothed and not rigid.
But also know that you have to have a decisive route, air, water, and electric all go the path of least resistance. With that being said ensure that the air doesn't just swirl around in the bottom and not flow out the top easier. I love double negatives in sentences. Engrish ish fun!
Re: The Ministroker!
Posted: Tue Jul 08, 2014 8:34 pm
by curtis966
Thanks LMH I will open up the front window a little more it is slightly smaller. As for the match up I angled all the edges slightly to avoid a wall but I didn't match them up perfectly. I did check it out tho and I think they will flow nicely.
Re: The Ministroker!
Posted: Tue Aug 05, 2014 10:19 am
by curtis966
Re: The Ministroker!
Posted: Tue Aug 05, 2014 12:46 pm
by Wheelman-111
Greetings:
Looks good, C. Don't forget the crank seals!


