Page 2 of 4
Re: 87 SE50 "Elite S" project..piece by piece
Posted: Tue Feb 07, 2017 8:52 pm
by Meatball
Current state of the transformation...waiting for a care package in the mail from G9.
Re: 87 SE50 "Elite S" project..piece by piece
Posted: Tue Feb 14, 2017 1:01 am
by Meatball
Progress of the day: Intake, Carb, Air Pod, Throttle Cable and BBK installed.
Re: 87 SE50 "Elite S" project..piece by piece
Posted: Tue Feb 14, 2017 1:06 am
by Meatball
Working on gauges when I ran out of steam for the night...They're hooked up and routed, just need to be mounted. Tomorrow I'll button that up and begin the clutch upgrade. Afterwards install tire, exhaust, battery and fuel then I will cross fingers and push the button to see what happens...lol
Re: 87 SE50 "Elite S" project..piece by piece
Posted: Tue Feb 14, 2017 7:56 am
by benji
If your using double-sided tape to mount the gauges remember to clean the plastic LIKE CRAZY and also heating up the plastic n double-sided tape up a little helps, like maybe to 75f or so.
Re: 87 SE50 "Elite S" project..piece by piece
Posted: Tue Feb 14, 2017 10:24 am
by Meatball
benji wrote:If your using double-sided tape to mount the gauges remember to clean the plastic LIKE CRAZY and also heating up the plastic n double-sided tape up a little helps, like maybe to 75f or so.
My plastics are painted black so I don't expect good adhesion with the tape. Im going to use screws for a solid attachment. I don't want them going anywhere.
Someday I will probably go with a Vapor but that's also when I go naked bars. Probably a project for next Winter. I will aim my next focus on suspension upgrades (rear shock, fork legs).
Re: 87 SE50 "Elite S" project..piece by piece
Posted: Tue Feb 14, 2017 9:56 pm
by benji
Screws are best. I see alot a guys using the double stick, I use it at work and it can be less than perfect haha.
Re: 87 SE50 "Elite S" project..piece by piece
Posted: Tue Feb 14, 2017 10:57 pm
by Meatball
Gauges done and work perfect. Got the scoot running today and did some tuning. The jets that came in the carb were 40/100. It just wouldn't idle with the 40 pilot so I dropped down to a 36. Then it would barely stay running and bog with the slightest amount of throttle. I tried the 32 pilot and it idles good. Now the idle screw actually works.
Still a long way to go. Will play with the needle tomorrow and do more heat cycles.
Re: 87 SE50 "Elite S" project..piece by piece
Posted: Wed Feb 15, 2017 7:41 am
by R1Titan911
Awesome! I am so over these heat cycles and just want to get on it haha!
Re: 87 SE50 "Elite S" project..piece by piece
Posted: Wed Feb 15, 2017 11:45 am
by Kustomkarma
What brand / type of black paint did you use on the gray plastics? They turned out really well.
Re: 87 SE50 "Elite S" project..piece by piece
Posted: Wed Feb 15, 2017 7:37 pm
by Meatball
http://www.krylon.com/products/camoufla ... echnology/
Its Krylon "Fusion" for plastics straight from the rattle can. The key is taking your time with proper prep work. Making sure all surfaces are cleaned with solvent prior to spray. Plenty of light coats with dry time inbetween. Ive seen tons of awful spray paint jobs where people rush through it and try to lay it on too fast/thick or be too close to the subject and cause runs or uneven millage. Gotta keep the hand moving with a sweeping motion and short bursts. Less is more. Its an art form. Ha!
Their "Fusion" paint has a camouflage line in a few different colors. Greens, Tans, Blacks, etc..for hiding your duck boat or going full RedNeck and como'ing out your pick-up truck. The color I chose was "Ultra-Flat" BLACK. Even though they claim its chip resistant, mine has a few tiny chips from the kids' bicycles in the garage. Luckily you can re-spray for touch ups and its flawless again.
Re: 87 SE50 "Elite S" project..piece by piece
Posted: Thu Feb 16, 2017 8:07 am
by R1Titan911
Dood that Kyrlon Fusion is my can of choice haha. Good stuff

Re: 87 SE50 "Elite S" project..piece by piece
Posted: Thu Feb 16, 2017 10:24 am
by benji
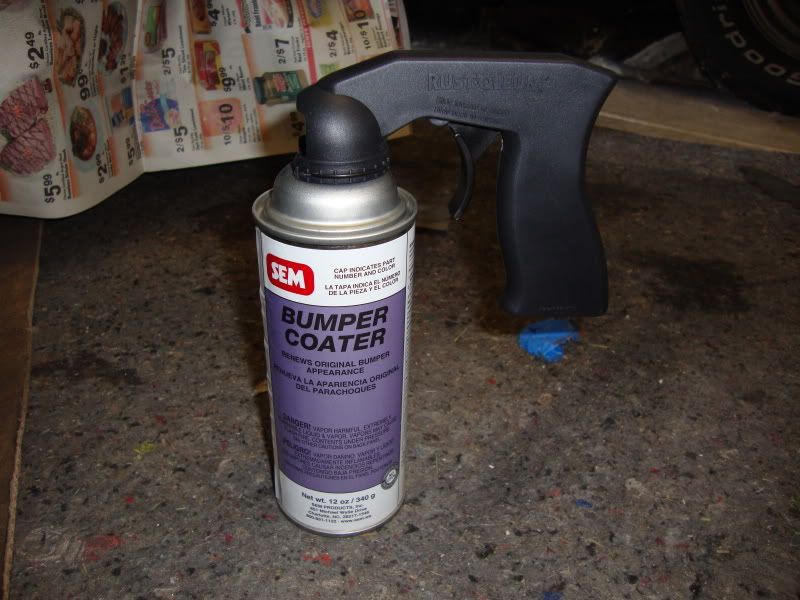
Go to a autobody supply store and look for "bumper coater". It's a line of common bumper and trim colors meant for non-metallic surfaces. It usually has more in the can than retail cans of paint available at hardware or auto parts stores.
Re: 87 SE50 "Elite S" project..piece by piece
Posted: Thu Feb 16, 2017 10:30 am
by benji
Here's what it looks like. Stuffs * killer. Comes in lots of blacks, greys, silvers...
Re: 87 SE50 "Elite S" project..piece by piece
Posted: Thu Feb 16, 2017 10:53 am
by Meatball
benji wrote:Go to a autobody supply store and look for "bumper coater". It's a line of common bumper and trim colors meant for non-metallic surfaces. It usually has more in the can than retail cans of paint available at hardware or auto parts stores.
Yeah, bumper paint has a flex additive to allow it to bend without cracking...to a point. It would be ideal for our scoots and all its rattling. If you can find it in a "flat" finish Id give it a shot. Ive found from past experience that Satin, Semi-gloss or Gloss is very difficult to achieve a decent looking finished product from a rattle can. The cans just don't produce the air-to-paint ratio to provide a fine enough mist for an even coat. The cans like to lay it on too thick and every flaw sticks out.
Re: 87 SE50 "Elite S" project..piece by piece
Posted: Thu Feb 16, 2017 11:06 am
by Meatball
During my heat cycle, it idles for a few minutes and the temp tops out at about 170 and the RPM's are hovering the 1500 area. I give it a little throttle and run it up to about 2000 RPM's and hold it there for about 20 seconds. That makes the temp slowly drop to about 160-ish. I would think the temps should rise instead of drop in this case. Does this indicate I need a needle clip adjustment?
