Page 1 of 2
Carb Bolt Falls Off - Stripped, Not Proper Size?
Posted: Thu Oct 02, 2008 11:47 pm
by adark248
I was installing a new speedo cable today, which was a b**** and took me waaaay longer than it should have. I got it in the mail and thought "Oh I'll throw this on in like 10 minutes" Famous last words. It works now, so that's good.
ANYWAY. I noticed that a bolt was on the ground after I got back from a quick spin to check the speedo cable. Turns out it's the carb bolt on the inside (closet to the cylinder) The bolt is not stripped, appears to have fine threads on it, but when I put it back in I've noticed that it doesn't tighten all the way, it just hits the head and spins.
1984 Aero 50, not a Spree, if that makes a difference.
Questions:
1) It's longer than the front bolt (closest to airbox). I'm assuming that's normal, but as I tore the bike apart for the speedo fix I've noticed that the previous owner might have cut some corners with this thing. Should it be longer?
2) It seems to be the same size as the front bolt, should it be a bigger size, so it's just spinning in there and not actually engaging?
2) Would this possibly account for my bike revving on the stand no matter how well I tune the carb? I can get it to idle perfectly, but after I ride for a few minutes and put it on the stand it will take off. Sometimes it's nearly impossible to get the idle perfect. Leave it overnight and you'll have to tune it the next day. I had the bike on and sprayed some carb cleaner near the intake manifold and the carb area and the engine revved up. So I was thinking there's obviously an air leak, could this bolt be the culprit?
Posted: Fri Oct 03, 2008 7:45 am
by keithw
You might have stripped the threads out of the carb. I've seen two types. One where the threads are cut directly in the carb base and the other with captive steel nuts. On mine with the threaded hole in the base the threads were stripped out on one side. I repaired them with a heli-coil. If you have the captive nut type you may have lost the nut. It isn't supposed to come out but they can. Having only one bolt holding the carb will cause running problems.
keithw
Posted: Fri Oct 03, 2008 10:58 am
by adark248
Thanks keithw, I figured it might be stripped on the carb.
Is there an easy way to tell? I haven't looked at it, but I'll try and bust out a flashlight and see what I can see later in the day. I've never used heli-coil, mind elaborating on where to get it and how it's used?
Posted: Fri Oct 03, 2008 11:52 am
by keithw
The easiest way would be to remove the carb and look in the mounting holes. If the bolt goes through the hole, turns, and won't tighten that's a pretty sure sign.
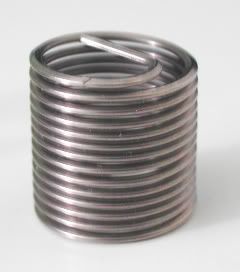
The heli-coil is a small spring looking thing made of diamond shaped wire. The stripped hole is drilled out and tapped with a special tap that comes in the kit. The heli-coil is then screwed into the hole returning it back to the original thread size. It takes a little bit of skill to use and the kits are a little pricey. However, it is about the best way to repair a stripped hole. I have done many on aluminum carbs and manifolds with good success. If you have only one to do you might check with bike shops or even auto repair places and see if they can install one for you. It's a pretty standard item in the repair business.
keithw
Posted: Fri Oct 03, 2008 12:25 pm
by MotorMaker
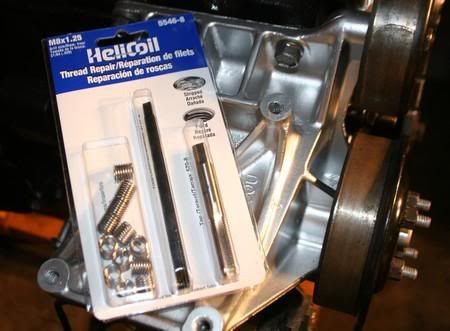
From Heli-coil website
Screw Thread Insert
Genuine Heli-Coil ® inserts are precision formed screw thread coils of stainless steel wire having a diamond shape cross section. Heli-Coil precision formed wire inserts are readily recognized and highly regarded products in the industry. Since its inception in 1938, Heli-Coil has been identified as an industry leader offering products with superior performance, reliability and integrity.
It is realy a simple system. And easy to use.
The parts look like this:
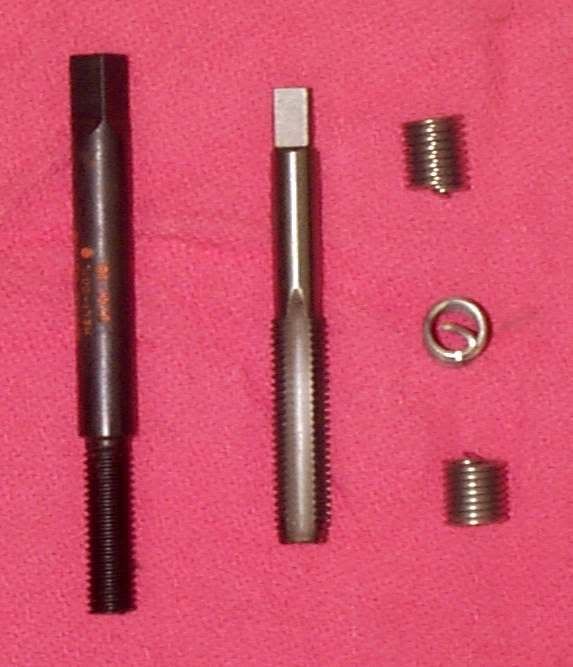

The procedure is as follows:
1 Drill out old threads with specified size drill
2 Tap hole with heli-coil tap(a normal tap will not work you must have the heli-coil tap)( because it is an odd pitch of thread)
3 Screw in helicoil with installation tool ( this step can be done with a pair of needle nose pliers)
4 Break tang off of coil
5 Threads are good as new and the same size as original
If you dont want to go that route you could just tap the hole 1 size over and use the appropriate size machine screw.
Posted: Fri Oct 03, 2008 12:27 pm
by MotorMaker
Ya beat me to it.
Posted: Fri Oct 03, 2008 12:47 pm
by Bear45-70
And if you strip out a heli-coil in aluminum you need to get a torque wrench, because you are definately over tightening things.

Posted: Fri Oct 03, 2008 2:24 pm
by noiseguy
On Spree the bolts are NOT the same size; one should be longer.
The carbs typically get stripped out when someone used the wrong bolt and overtightens, jacking the threads out of the carb.
There's very little on a aluminum-engine anything that requires more than a 1/4" drive. Using the smaller drive is a good way to stay out of trouble.
Posted: Fri Oct 03, 2008 3:42 pm
by Kenny_McCormic
Helicoil works great.
Posted: Fri Oct 03, 2008 4:33 pm
by Dac
or you could skip all that and do a super cheap/ easy thing...

Cubey did this, just head to a hardware store and pick up some cheap bolts.
it cost like a $1 or so to do this, it might not look the best but the panel will cover it anyway.
Posted: Fri Oct 03, 2008 6:31 pm
by noiseguy
Ooo, I like that.
I've look at the 6mm helicoil kits to fix a carb I have, last place wanted $35 for a set. I just don't plan to strip out that many 6mm bolts. Insult to injury that the SAE sets are $10.
Posted: Fri Oct 03, 2008 6:58 pm
by Kenny_McCormic
My dad works in a trans shop, we was able to get a couple for free.
Posted: Thu Oct 09, 2008 1:42 pm
by adark248
Dac wrote:or you could skip all that and do a super cheap/ easy thing...
.
This was my first thought, but the bolt that's messed up is on the back. I went to ACE and got a bolt that's a little longer and three types of nuts: lock, normal and thumb type. The lock nut and nut with the thumb wings don't work.
The other nut might work, but since It's on the back I can't get around to hold it in place while I tighten the bolt. I only got 1 to put on the back, your pic has one on the front too. What advantage does that give? The way I have it set up, the bolt and the nut just kind of spin, can't tighten it enough.
Posted: Thu Oct 09, 2008 2:04 pm
by MotorMaker
The second nut is what makes the whole thing work. You could do the same thing with a short piece of "all-thread"(threaded rod) and two nuts.
Posted: Thu Oct 09, 2008 2:14 pm
by noiseguy
MotorMaker wrote:The second nut is what makes the whole thing work. You could do the same thing with a short piece of "all-thread"(threaded rod) and two nuts.
Exactly, that's why I thought this was a neat/novel solution that is cheap. You don't need to access the back bolt, it works just like a stud. The bolt (rather than allthread) is the way to go; you can hold the bolt head while you tighten the 2nd nut.